Search
How can I use my own photo as a background in my photo book?
You can upload and use your own images as page backgrounds in your photo book project. You’re not limited to the built-in ones available in the editor. It’s a great way to personalise your project by using textures, landscapes, or full-page images behind your layout.
To use built-in background images:
Click the ‘Backgrounds’ tab at the bottom of the editor

Drag and drop your chosen background onto the left or right page
To use your own photo as a background:
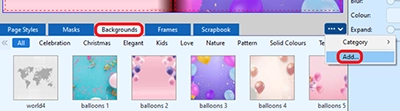
Click the ‘Backgrounds’ tab at the bottom of the editor
Click the cog icon towards the bottom right corner
Select ‘Add’ from the dropdown
Choose the image from your computer and click ‘Add’. Your image will appear as a thumbnail at the end of all the built-in backgrounds.
Drag it onto the page to use it as a background
For the best print results, make sure your image is high resolution unless you don’t mind if it is a bit soft.
For solid backgrounds instead of photos, you can also apply a plain colour background to your page.